


These Grinch cake pops capture the villain’s most iconic moments in bite-sized Christmas treats that are almost too cute to eat.
My favorite Christmas movie has always been the 1966 version of How the Grinch Stole Christmas!, particularly for the bright, whimsical animation that can come only from the mind of Dr. Seuss. That’s why, when this Grinch cake pops recipe came across my desk, I knew our Test Kitchen pros nailed the Christmas dessert.
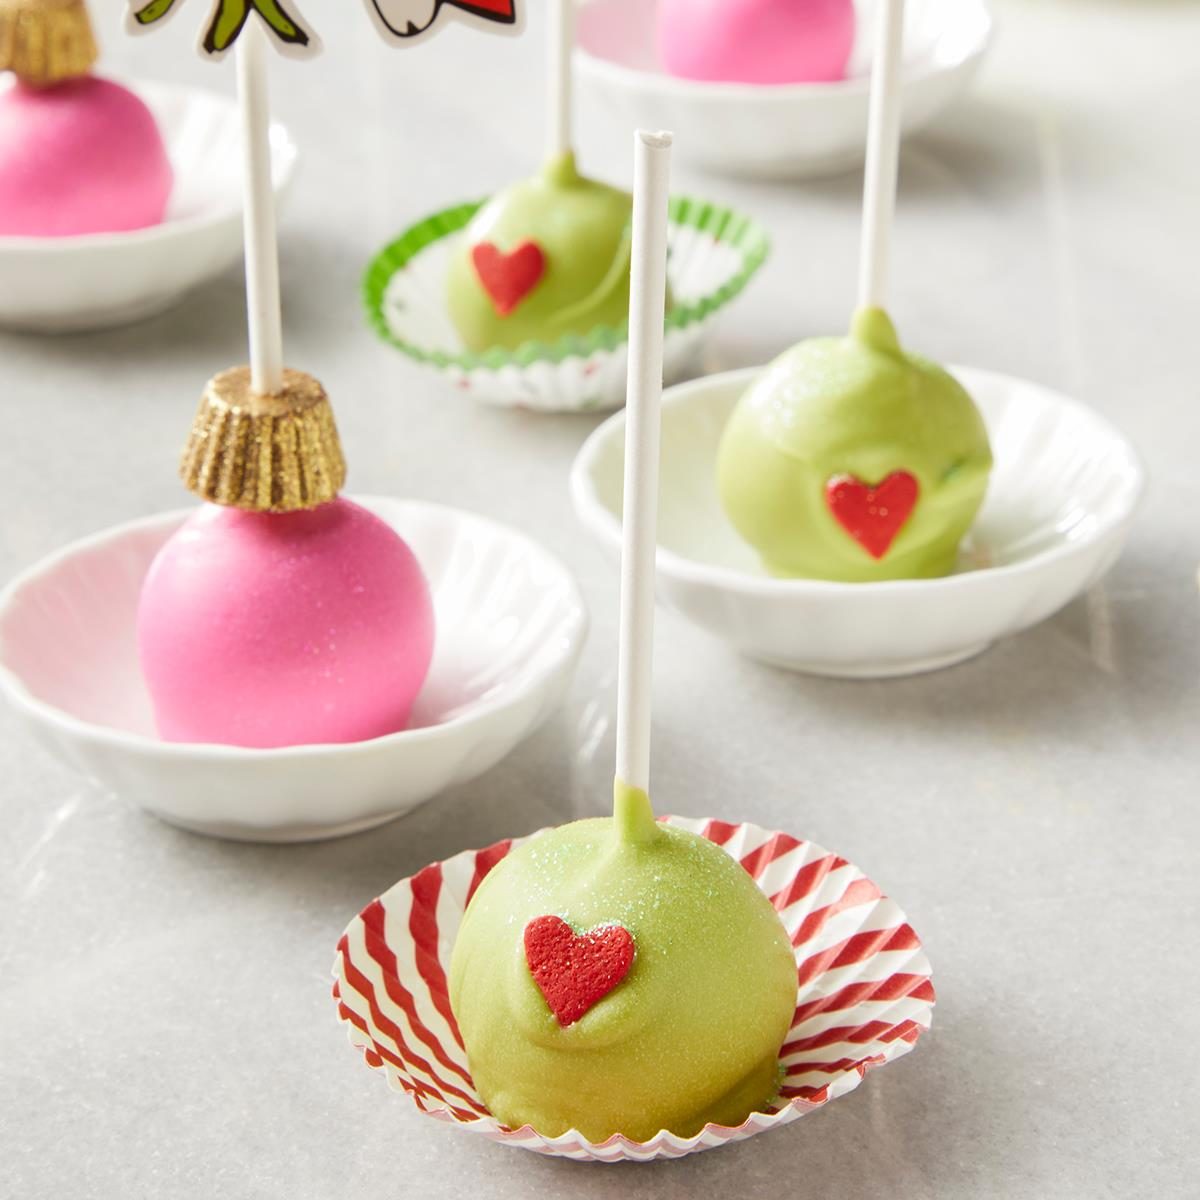
These cake pops capture the most iconic scenes from the movie: the Grinch stealing the Christmas ornaments off the tree and his too-small heart beating in his chest. The vivid colors are spot-on, and unbridled whimsy is expertly packed into the bite-sized desserts. Save these for a Christmas movie night or a holiday party, and serve them with other recipes inspired by the Grinch.
Ingredients for Grinch Cake Pops
- Red velvet cake mix: Boxed red velvet cake mix makes this recipe a breeze. Or, you can bake your own red velvet cake from scratch, so long as it makes enough batter to bake in a 13×9-inch pan.
- Cream cheese frosting: As with the cake mix, we used store-bought cream cheese frosting to keep the recipe a little easier. Purists can use homemade cream cheese frosting, as desired.
- Candy coating: You’ll need 1 pound of green candy coating and 1 pound of pink candy coating to have enough to coat the cake pops. Be sure to buy vibrant colors to match the iconic Dr. Seuss hues.
- Heart candies: Find gummy heart candies or sprinkles through online retailers. You can also check the cake decorating aisles of craft stores.
- Mini peanut butter cups: Unwrapped mini peanut butter cups make the cute ornament tops. Be sure to poke the holes in them with the cake pop sticks before putting all the sticks in the cake balls.
- Gold edible luster dust: Most craft stores carry edible gold luster dust. You’ll also need a paintbrush (that has never been used with actual paint before) for the application.
Directions
Step 1: Bake the cake
Prepare and bake the cake mix according to the package directions, following the 13×9-inch baking pan version of instructions. Cool the cake completely to room temperature.
Step 2: Mix the cake and frosting

Crumble the baked cake into crumbs in a large bowl. Add the cream cheese frosting and stir everything together until the mixture holds together when scooped.
Step 3: Shape the cake balls and chill

Shape the cake mixture into 1-1/2-inch balls. Place the cake balls on parchment-lined baking sheets, and refrigerate them until they’re easy to handle, about one hour.
Insert sticks into the centers of the cake balls. Freeze or refrigerate the cake pops until firm, at least two hours in the freezer or three hours in the refrigerator.
Step 4: Make the Grinch cake pops

Melt the green candy coating in a microwave-safe bowl just until it is completely melted and lump-free. Do not overheat the mixture, as it will thin out the coating too much.
Dip each cake ball in the melted green candy coating. Allow the excess to drip off. Place one red candy heart onto the cake pop, and let the candy coating set.
Editor’s Tip: Lightly tap the cake pop stick on the side of the bowl to help excess candy coating drip off, then twirl the cake pop so there aren’t any drips forming. Doing this will help ensure your cake pop doesn’t set with a “foot” underneath.
Step 5: Make the ornament cake pops

Poke a hole with an extra cake pop stick into the center of each unwrapped mini peanut butter cup. With a paintbrush that has never been used before, dust each cup with edible gold luster dust. Set them aside.

Melt the pink candy coating in a microwave-safe bowl until just melted. Try not to overheat the mixture or it will thin out the coating too much. Dip each cake ball in the coating and allow all the excess to drip off to prevent a “foot” from forming underneath. Thread the golden peanut butter cup on the top of the cake pop. Let the cake pop’s candy coating set.
Editor’s Tip: Keep the mini peanut butter cups in a cool, dry place so they don’t melt. Otherwise, the chocolate will smudge and run all over the cake pop sticks when you go to thread them.

Recipe Variations
- Change the cake flavor: No need to stick to red velvet here! You can really use any cake mix flavor you’d like. Check out the Variations section in our ultimate cake pops recipe for all sorts of cake and frosting pairings.
- Add peppermint extract: ‘Tis the season for all things peppermint! Add 1/8 teaspoon of peppermint extract to the cake batter for that Christmas flavor.
- Turn the pops into truffles: Go stickless and make these easy Grinch cake pops into truffles. To dip the cake balls into the melted candy coating, balance each ball on a fork and roll it in the coating. Scoop it up with the fork, and tap the fork on the side of the bowl to knock off excess candy coating.
How to Store Grinch Cake Pops
Store Grinch cake pops in an airtight container at room temperature in a cool, dry place for up to two days. You can also store cake pops in the fridge for up to five days.
Can you freeze Grinch cake pops?
Yes, you can freeze Grinch cake pops for up to two weeks. Store them in an airtight container or zip-top bags. Thaw them at room temperature in a cool, dry place.
Grinch Cake Pop Tips

Why is the candy coating cracking?
The candy coating of these Grinch-themed cake pops will crack if very cold cake pops are dipped into very hot melted candy coating. Refrigerate or freeze the uncoated cake pops for only the specified time. When melting the candy coating, heat the coins just until they’re melted. Overheating will make the coating too hot, causing it to crack when it enrobes the cake pops. Also, the coating will be extremely thin, and you’ll see the cake through the coating. Melting the candy coating just so keeps it very viscous, coating the cake pop with a beautifully thick and even outer layer.
What if you can’t find any red heart sprinkles?
If you can’t find any red heart gummies or sprinkles at the store or online, make some out of red fondant. Press a mini heart-shaped cookie or fondant cutter into the red fondant. Let the hearts dry out a bit so they can hold their shape well. Do this before melting the candy coating so they’re ready to go before the coating hardens!
How do you add the Grinch’s hands to the cake pop sticks?
Our team was able to add the Grinch’s hands to the cake pop sticks using Grinch cupcake toppers. The ones we ordered had ornaments in the Grinch’s hands, so we cut off the ornaments and taped the hands to the cake pop sticks. Find some through online retailers.
Ingredients
- 1 package red velvet cake mix (regular size)
- 1 can (16 ounces) cream cheese frosting
- 1 pound each green and pink chocolate candy coating
- Red gummy heart candies or sprinkles
- 1 package (8 ounces) Unwrapped Peanut Butter Cups Minis
- Gold edible luster dust
Directions
- Prepare and bake cake mix according to package directions using a 13x9-in. baking pan. Cool completely.
- Crumble cake into a large bowl. Add frosting and mix until mixture holds together when scooped. Shape into 1-1/2-in. balls. Place on baking sheets. Refrigerate until easy to handle, about 1 hour. Insert sticks. Freeze for at least 2 hours or refrigerate for at least 3 hours or until cake balls are firm.
- For Grinch pops, in a microwave, melt green candy coating. Dip each cake ball in coating; allow excess to drip off. Place one red candy heart onto the cake pop; let stand until set.
- For ornament cake pops, poke a hole with a cake pop stick into each peanut butter cup's center. Brush dust onto cups with gold luster dust. Set aside.
- Melt pink candy coating. Dip each cake ball in coating; allow excess to drip off. Thread peanut butter cup on top of cake pop. Let stand until set.
- Store in airtight containers.
Loading Popular in the Community
Our Grinch cake pops are decorated in two ways: Half have a green candy coating and red heart sprinkles reminiscent of the Grinch, while the other half look like mini ornaments with mini peanut butter cups and a pink candy coating. —Margaret Knoebel, Milwaukee, Wisconsin
Recipe Creator
Loading Reviews