


Soft, sweet, and scented with orange and anise, pan de muerto is more than bread. It's a beautiful tradition, baked to remember and celebrate your loved ones for Dia de los Muertos (Day of the Dead).
Pan de Muerto (Mexican Day of the Dead Bread)


Every year as the end of October approaches, I reach for flour, aniseed and orange zest to make a batch of pan de muerto, Mexico’s beloved Day of the Dead bread. For me, it’s more than a recipe—it’s a ritual. The warm scent of citrus and spice that fills the kitchen takes me back to my childhood in Mexico, baking with my grandmother and listening to the stories she told. I like to save a loaf and set it on my grandmother’s ofrenda, her Dia de los Muertos altar, because it brings me comfort in remembering her. It is my way of keeping her memory alive. Like many Mexican food recipes, pan de muerto is full of tradition and family history.
While families place pan de muerto on altars as an offering to the dead, it’s to be enjoyed by the living too! Eating the bread is a shared remembrance, an edible way to honor and feel close to our loved ones. Families often gather around coffee, hot chocolate or champurrado to share stories while enjoying this spongy, fragrant bread as a treat or dessert after a celebratory feast. It’s a meaningful way to participate, remember and bond with loved ones.
What is pan de muerto?
Pan de muerto directly translates to “bread of the dead.” It is a traditional Mexican sweet bread made and enjoyed during the season of Dia de los Muertos, or Day of the Dead, celebrated every November 1 and 2. As early as September, you’ll see loaves of the sweet bread in Mexican bakeries.
This holiday is not about mourning but about celebrating the lives of departed loved ones, inviting their spirits back to visit through carefully prepared altars, or ofrendas, adorned with marigolds, candles, photographs and foods they loved in life. You’ll see pan de muertos with tamales, hot chocolate and other Day of the Dead foods.
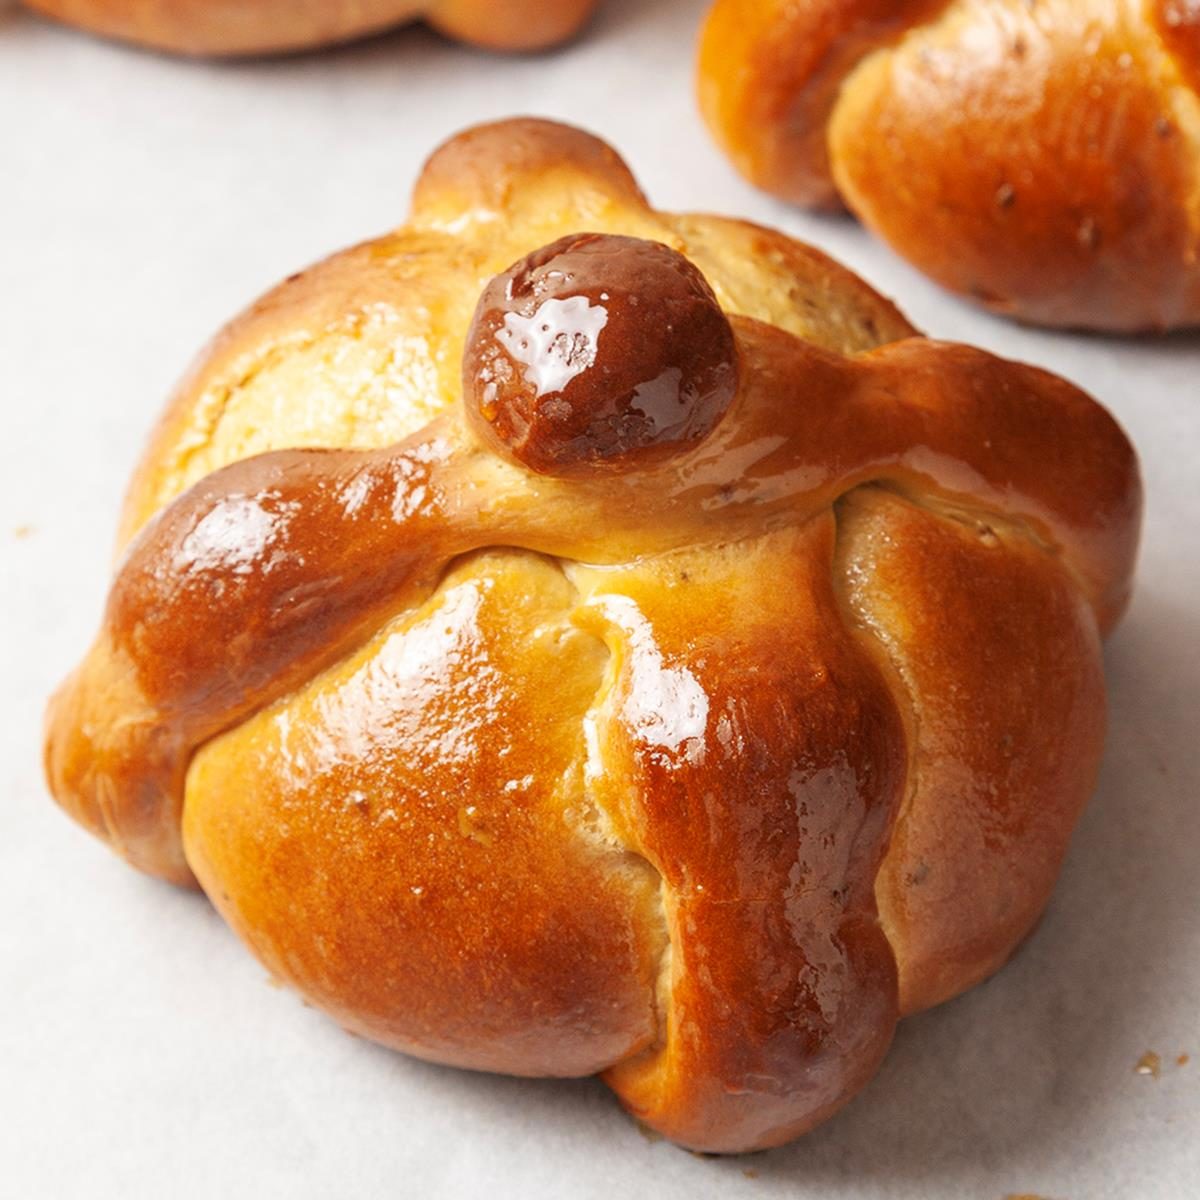
The bread itself is rich in symbolism. The round shape, often topped with dough-shaped bones and tears, represents the circle of life. The center ball symbolizes a skull. The orange and anise flavors reflect a fusion of pre-Hispanic and Spanish influences, adding to the bread’s deep cultural meaning.
Ingredients for Pan de Muerto
- All-purpose flour: All-purpose flour is the foundation of your dough, providing structure and body. The amount may vary depending on humidity and how much moisture the flour absorbs. Start with less and add more as needed to create a soft dough.
- Sugar: Sugar sweetens the bread and helps balance the aromatic notes of citrus and spice. It also contributes to the golden color of the crust when baked.
- Quick-rise yeast: Quick-rise, or instant, yeast speeds up fermentation, allowing the dough to rise faster. Yeast helps the bread puff up and creates a soft, airy crumb with that slightly yeasty, home-baked aroma we all love.
- Aniseed: Anise is a defining flavor in traditional pan de muerto recipes, and aniseed infuses the bread with a warm, subtly sweet licorice-like flavor that’s both nostalgic and fragrant. You can lightly crush it for a more pronounced flavor throughout the dough.
- Salt: Salt balances the sweetness and enhances the overall flavor of the bread.
- Evaporated milk: Evaporated milk contributes to the tenderness of the bread. You can substitute whole milk in a pinch, but evaporated milk gives a more traditional texture.
- Butter: Incorporating unsalted butter into the dough creates a soft, tender crumb and gives the bread that classic buttery flavor. Cubing it ensures it melts evenly into the mixture.
- Eggs: Eggs enrich the dough and contribute to its color, structure and soft texture. Use room-temperature eggs so they incorporate more easily and evenly into the dough.
- Glaze: A sugar and orange juice glaze gets brushed over the bread, giving it a glossy finish and an extra burst of sweetness.
- Colored sugar or coarse sugar: Colored or coarse sugar is optional, but it decorates the bread and gives it a festive flair. Coarse or colored sugar adds a pleasant crunch and visual sparkle, especially when served on an ofrenda.
Directions
Step 1: Make the dough

In a large bowl, mix 1-1/2 cups flour with the sugar, yeast, aniseed and salt. In a small saucepan, heat the milk, butter and water to 120° to 130°F. Add the milk mixture to the dry ingredients and beat on medium speed for two minutes. Add the eggs and beat on high for two minutes. Stir in enough remaining flour to form a soft dough (the dough will be sticky).
Editor’s Tip: If using active dry yeast instead of quick-rise, proof the yeast in a small amount of warm water with a bit of sugar before adding it to the mixture.
Step 2: Knead the dough and let it rise

Turn the dough onto a floured surface and knead for 10 to 15 minutes until it’s smooth and elastic. Place the dough in a greased bowl, turning once to grease the top. Cover the bowl and let the dough rise in a warm, draft-free place until doubled in size, for about one hour.
Editor’s Tip: If your kitchen is cool, place the bowl inside a turned-off oven with the light on to create a warm environment for proofing.
Step 3: Shape the dough

Punch down the dough and divide it into four portions. Shape three portions into smooth round loaves and place them on a greased baking sheet.

Shape the remaining dough into three 1-inch balls and six 8-inch strands resembling bones, tears or braids.

Lightly score the tops of the round loaves where the decorative strands will be attached, and use a little water to help the decorative pieces stick. Top each with a small ball. Cover the loaves with a clean kitchen towel and let them rise again for about 30 minutes.
Editor’s Tip: When shaping the bone decorations, roll the dough ropes lightly with your fingertips, then indent them in the middle to mimic the look of bones. Arrange two “bones” crossed over the top of each loaf and place a small dough ball in the center.
Step 4: Bake the loaves
Preheat the oven to 350°F. Bake the loaves for 30 minutes.
Step 5: Make the glaze
Meanwhile, in a small saucepan, combine the sugar and orange juice. Bring the mixture to a boil over medium heat. Cook and stir until syrupy, about five minutes, then remove from the heat.
Editor’s Tip: Watch the glaze as it thickens. It should coat the back of a spoon. If it reduces too much, it may crystallize when brushed on, so remove it from the heat once it reaches a syrupy consistency.
Step 6: Add the glaze and finish baking

Brush the warm loaves generously with the orange syrup. Sprinkle with colored sugar or coarse sugar for sparkle and crunch. Return the loaves to the oven and bake until golden brown, 5 to 10 minutes longer. Remove the bread from the baking sheets and cool on a wire rack.
Editor’s Tip: Brushing the loaves while they’re still warm allows the glaze to soak in slightly, enhancing the flavor and the shine. Don’t skip the wire rack. Cooling on a flat surface can cause the bottoms of the loaves to become soggy.

Pan de Muerto Variations
- Spice it up: Add a teaspoon of cinnamon and the zest of one orange to the dough for a warm, citrusy twist that enhances the traditional flavor.
- Make it chocolate: Mix 1/4 cup of cocoa powder into the flour and add mini chocolate chips for a chocolaty-rich, modern take on this classic Day of the Dead bread.
- Add festive colors: Swap in vibrant pink, purple or orange sanding sugar for the traditional white or clear coarse sugar. If making a chocolate variation, grate a Mexican chocolate tablet and use the ground-up bits as a coarse chocolate topping.
- Make it bigger: Instead of shaping smaller loaves, form one large, dramatic round loaf for the center of your ofrenda. Just be sure to extend the baking time by 10 to 15 minutes.
How to Store Pan de Muerto
Our pan de muerto recipe can be stored at room temperature in an airtight container or zip-top bag. Make sure it’s completely cooled before storing to prevent moisture buildup, which can lead to sogginess. To store for a longer time, store it in the freezer.
How long does pan de muerto last?
When stored at room temperature, pan de muerto stays soft and tasty for up to three days. After that, it may start to dry out, but it can still be enjoyed toasted or warmed.
Can you freeze pan de muerto?
To freeze pan de muerto, wrap it tightly in storage wrap and place it in a freezer-safe bag or container. It will keep for up to two months. When ready to enjoy, thaw it at room temperature and warm it slightly in the oven to return its fresh-baked texture.
Pan de Muerto Tips

Can you make pan de muertos dough in a bread machine?
Yes, you can mix and knead the dough with a bread machine. Make sure to follow your machine’s instructions. Once ready, remove it from the bread machine, shape it by hand with the traditional round loaf and decorative bone shapes, then bake.
How do you get the bone shapes to hold their form while baking?
To help the decorative bone-shaped strips and dough balls hold their shapes, chill them in the fridge for 10 to 15 minutes before arranging them on the loaves. This firms up the dough slightly, preventing it from spreading too much in the oven and keeping the designs more defined.
How do you keep the sugar topping from melting?
To keep the sugar coating from melting, let the syrup cool slightly before brushing it on and apply a light layer rather than soaking the loaf. This helps the colored or coarse sugar stick without dissolving, preserving that beautiful, crunchy finish.
Ingredients
- 4-1/2 to 5-1/2 cups all-purpose flour
- 1/2 cup sugar
- 2 packages (1/4 ounce each) quick-rise yeast
- 1 tablespoon aniseed
- 1 teaspoon salt
- 1 can (5 ounces) evaporated milk
- 1/2 cup butter, cubed
- 1/3 cup water
- 4 large eggs, room temperature, lightly beaten
- glaze:
- 1/2 cup sugar
- 1/3 cup orange juice
- Colored sugar or coarse sugar
Directions
- In a large bowl, mix 1-1/2 cups flour, sugar, yeast, aniseed and salt. In a small saucepan, heat milk, butter and water to 120°-130°. Add to dry ingredients; beat on medium speed 2 minutes. Add eggs; beat on high 2 minutes. Stir in enough remaining flour to form a soft dough (dough will be sticky).
- Turn out dough onto a floured surface; knead until smooth and elastic, 10-15 minutes. Place in a greased bowl, turning once to grease the top. Cover and let rise in a warm place until doubled, about 1 hour.
- Punch down dough. Turn out onto a lightly floured surface; divide into 4 portions. Shape 3 portions into round loaves. Place on greased baking sheets. Shape remaining dough into three 1-in. balls and six 8-in. strands resembling bones, tears, or braids. Lightly score the tops of round loaves where decorative stands will be attached; attach strands to each with water. Top with small ball. Cover with kitchen towels; let rise in a warm place until doubled, about 30 minutes.
- Preheat oven to 350°. Bake loaves for 30 minutes. Meanwhile, for glaze, combine sugar and orange juice in small saucepan. Bring to a boil over medium heat. Cook and stir until syrupy, about 5 minutes. Remove from heat.
- Brush loaves with syrup. Sprinkle with colored sugar; return to oven. Bake until golden brown, 5-10 minutes longer. Remove from pan to a wire rack to cool.
Loading Popular in the Community
Every year, I make a batch of this Day of the Dead bread to place on my grandmother’s altar. The smell of dough rising in the kitchen is an unforgettable aroma that reminds me of those brisk evenings at my grandmother’s house, the night before we visited the cemetery on Dia de Los Muertos.
Recipe Creator
Loading Reviews