


Meet Smith Island cake—a beloved Maryland dessert that's rooted in community and coated in chocolate.
Across America, almost every state has a signature food and dessert that residents enjoy. In Maryland’s case, the food is stuffed ham and the dessert is the iconic Smith Island cake. The cake is so special to Marylanders, in fact, that it’s their official state dessert. We’ll show you how to make this multi-layer cake right at home, without having to tie a boat at Smith Island Bakery’s customer dock.
What is Smith Island cake?
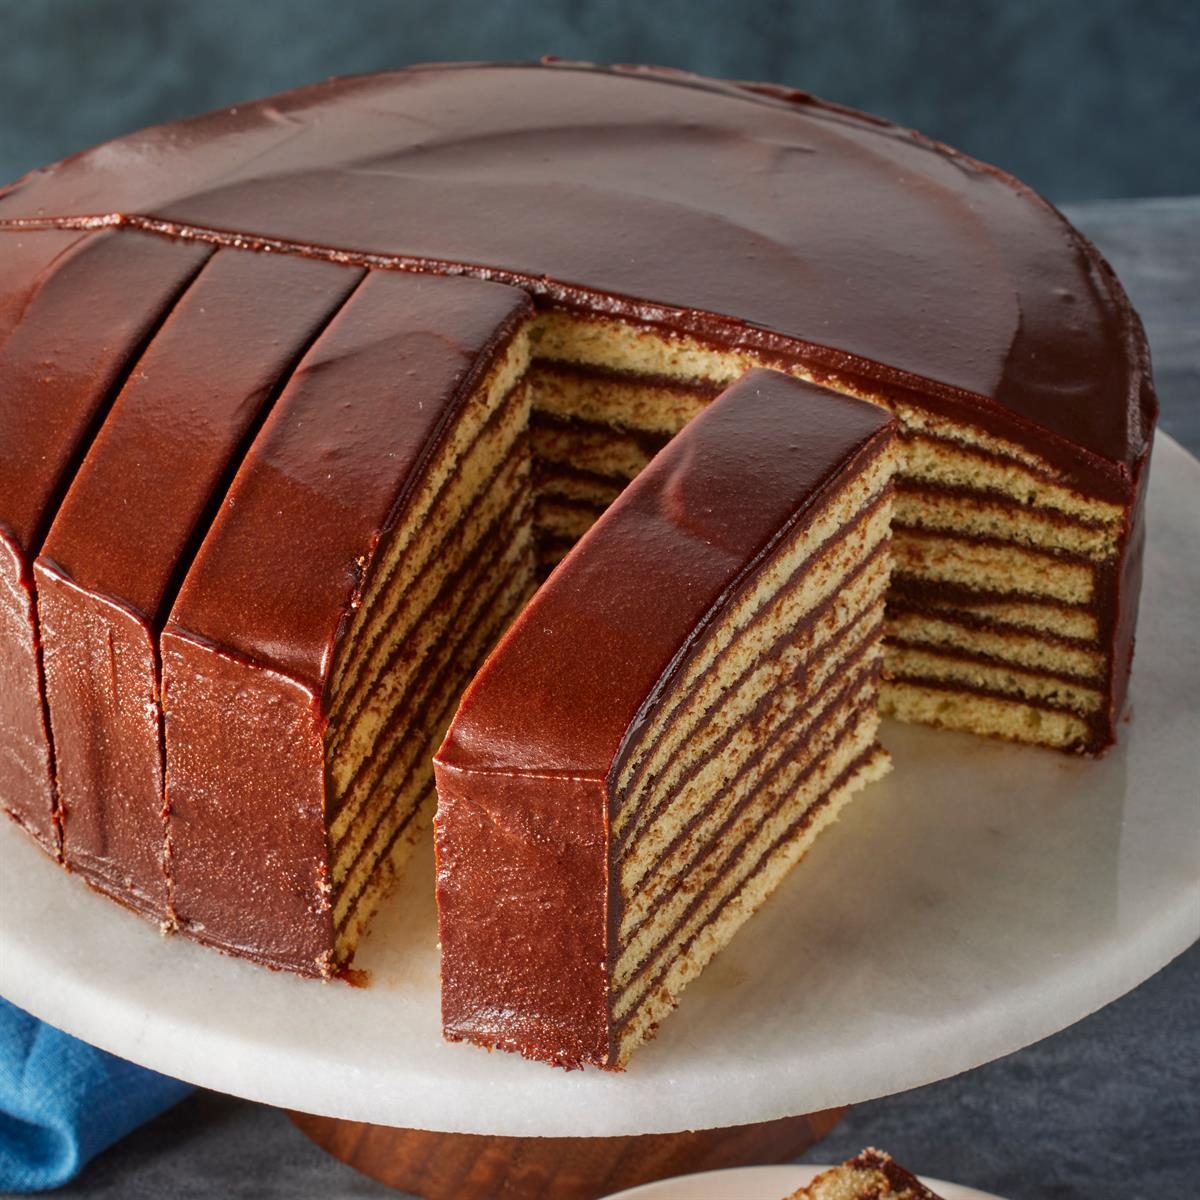
At its core, a Smith Island cake is made of many thin, pancake-like layers of yellow cake separated by decadent fudge icing. It’s somewhat like a crepe cake but with fewer, thicker layers.
This Smith Island cake recipe dates all the way back to the 1800s, when women on Smith Island would bake cakes for their husbands to enjoy during the island’s autumn oyster harvest. The cakes were intended to serve as a symbol of togetherness and remind the oyster hunters of their loved ones waiting for them to return home. Today, the cake is famous in Maryland, where it’s especially popular as a holiday dessert.
Ingredients for Smith Island Cake
- Butter: Soften the butter so it creams easily with the sugar. There’s a lot of butter in the cake, so buy one of the best butter brands for a quality butter flavor.
- Sugar: Granulated sugar is the best sweetener for this cake. It creams with the softened butter, and its white hue keeps the cake pale, creating a color juxtaposition between the frosting and cake.
- Eggs: Anytime you bake a cake, bring the eggs to room temperature so they emulsify into the batter. It bakes more voluminous and structured cake layers.
- Buttermilk: Tangy buttermilk adds flavor to the cake, but its acidity also tenderizes the cake.
- Cake flour: Cake flour has the lowest protein content, which makes cakes light and airy. You can substitute all-purpose flour, but you’ll notice a major difference in texture and the cake won’t be as traditional.
- Leavening agents: Since the cake layers are thin, we’ll want to use a good amount of leavening agents to help the layers rise as much as possible so they are defined.
- Frosting: The frosting is somewhere in between hot fudge and chocolate ganache. You’ll need sugar, evaporated milk, unsweetened chocolate, baking cocoa, butter and a touch of vanilla extract.
Directions
Step 1: Make the batter

Preheat the oven to 350°F. In a large bowl, whisk together the cake flour, baking soda, baking powder and salt, and set the bowl aside.

In a separate large bowl, use a hand mixer or stand mixer to cream the softened butter and sugar together until it’s light and fluffy, five to seven minutes. Add the eggs, one at a time, and the vanilla extract, beating well after each addition.

Alternately add the flour mixture and the buttermilk to the creamed mixture, starting and ending with the flour mixture.
Step 2: Portion the batter

Grease and line two 9-inch cake pans. Add 3/4 cup batter to each pan, and spread it out evenly.
Editor’s Tip: The cake layers are very thin and fragile, so it’s important you properly grease the cake pans to avoid breakage.
Step 3: Bake the cake layers
Slide the pans into the oven and bake for 10 to 12 minutes. Let the cake layers stand in the pans for five minutes to finish setting up. Carefully remove the cakes onto wire racks to cool completely to room temperature. Meanwhile, repeat with the remaining batter until all eight cake layers are baked.
Editor’s Tip: We are baking two cake layers at a time—we’re going to assume you don’t have eight 9-inch cake pans in your cupboards!
Step 4: Prepare the frosting

Meanwhile, in a small saucepan, combine the sugar and evaporated milk. Cook the mixture until the sugar is dissolved.

Add the unsweetened chocolate, baking cocoa and softened butter.

Cook the mixture until it’s thickened, six to eight minutes longer. Remove the saucepan from the heat and stir in the vanilla extract.
Editor’s Tip: The fudge will be thin at this stage. Don’t worry; it will continue to thicken as it cools.
Step 5: Assemble the cake

Place one cake layer on a serving plate, and spread 4 to 5 tablespoons of frosting on top. Repeat with all the cake layers, doing your best to line them up evenly with each other so as not to create a Leaning Tower of Pisa situation. Top the cake with the remaining cake layer, and frost the top and sides of the cake with the remaining frosting.
Editor’s Tip: Don’t be too concerned if you get a few tears in your cake layers along the way. Even once sliced, these imperfections will not be noticeable on the finished cake.

Recipe Variations
- Change the cake flavors: While this flavor combination is considered the original, bakeries along the Maryland coast have begun deviating from the classic recipe, offering flavors such as coconut, double chocolate, red velvet and lemon. Bake and build your favorite cake recipes in the Smith Island fashion.
- Add decorations: There are lots of creative ways to decorate a cake, but for a Smith Island cake recipe, the best decorations are simple ones: toasted almonds, rainbow sprinkles or edible flowers.
How to Store Smith Island Cake
Store leftovers of Smith Island cake in a covered cake carrier or cake dome at room temperature for up to three days. If you live in a warm climate or your kitchen runs hot, you may also store the cake in the refrigerator to prevent the fudge from melting. If stored in the fridge, be sure to store the cake in an airtight cake dome to prevent it from drying out.
Can you freeze Smith Island cake?
Yes, you can freeze Smith Island cake. After assembling the cake, place it in the freezer, uncovered, until the frosting has hardened, about 30 minutes. Then wrap the cake in storage wrap and freeze it for up to two months. To thaw, uncover the cake and let it sit at room temperature for about one hour. You could also freeze individual slices (wrapped in storage wrap) in an airtight container.
Smith Island Cake Tips

How many layers should a Smith Island cake have?
Unlike traditional layer cakes that have only two or three layers, a Smith Island cake has anywhere from 8 to 13 layers of moist yellow cake. Ultimately, it’s up to the individual baker to determine exactly how many layers to use in their cake. In our recipe, we’re following the guidance of Brian and Joy Murphy, owners of the official Smith Island Baking Company in Maryland. Their famous cakes feature eight layers of fluffy, moist cake.
What is Smith Island cake’s traditional frosting?
Smith Island cake is frosted with a rich, fudgelike frosting. Historically, this type of frosting was used because buttercream did not hold up as well while being transported during the annual oyster hunts. Today, the use of this type of frosting is simply a matter of tradition.
How can you cut perfect slices of Smith Island cake?
To cut perfect slices of Smith Island cake, run a sharp chef’s knife under hot water, carefully wipe it dry and make the first cut. Repeat the same process after every cut, washing away the debris on the knife and drying the blade before cutting. It may feel a bit tedious in the moment, but you’ll get picture-perfect slices of cake that show off all eight layers.
Ingredients
- 1-1/2 cups butter, softened
- 2-1/4 cups sugar
- 3 large eggs, room temperature
- 1-1/2 cups buttermilk
- 1-1/2 teaspoons vanilla extract
- 3-3/4 cups cake flour
- 2-1/4 teaspoons baking soda
- 1-1/2 teaspoons baking powder
- 3/4 teaspoon salt
- frosting:
- 3 cups sugar
- 1-1/2 cups evaporated milk
- 8 ounces unsweetened chocolate, chopped
- 3 tablespoons baking cocoa
- 3/4 cup unsalted butter
- 1-1/2 teaspoons vanilla extract
Directions
- Preheat oven to 350°. In a large bowl, combine flour, baking soda, baking powder and salt; set aside.
- In a large bowl, cream butter and sugar until light and fluffy. Add eggs and vanilla, beating well after each addition. Add dry mixture to the creamed mixture alternately with buttermilk.
- Grease and line two 9-in. cake pans. Add 3/4 cup batter to each pan, spread evenly. Bake 10-12 minutes. Let stand in pans 5 minutes; cool completely on wire racks. Repeat with remaining batter until 8 cake layers are baked.
- Meanwhile, in a small saucepan, combine sugar and evaporated milk. Cook until sugar is dissolved. Add chocolate, cocoa and butter. Cook until thickened, 6-8 minutes longer. Remove from heat; add vanilla.
- Place 1 cake layer on a serving plate; spread with 4-5 tablespoons frosting. Repeat layers. Top with remaining cake layer. Frost top and sides of cake with remaining frosting.
Loading Popular in the Community
Loading Reviews