


This squash focaccia is a seasonal twist on the classic Italian bread. Layered with fall flavors, the easy-to-make bread is ideal for holiday spreads or cozy weeknight meals.
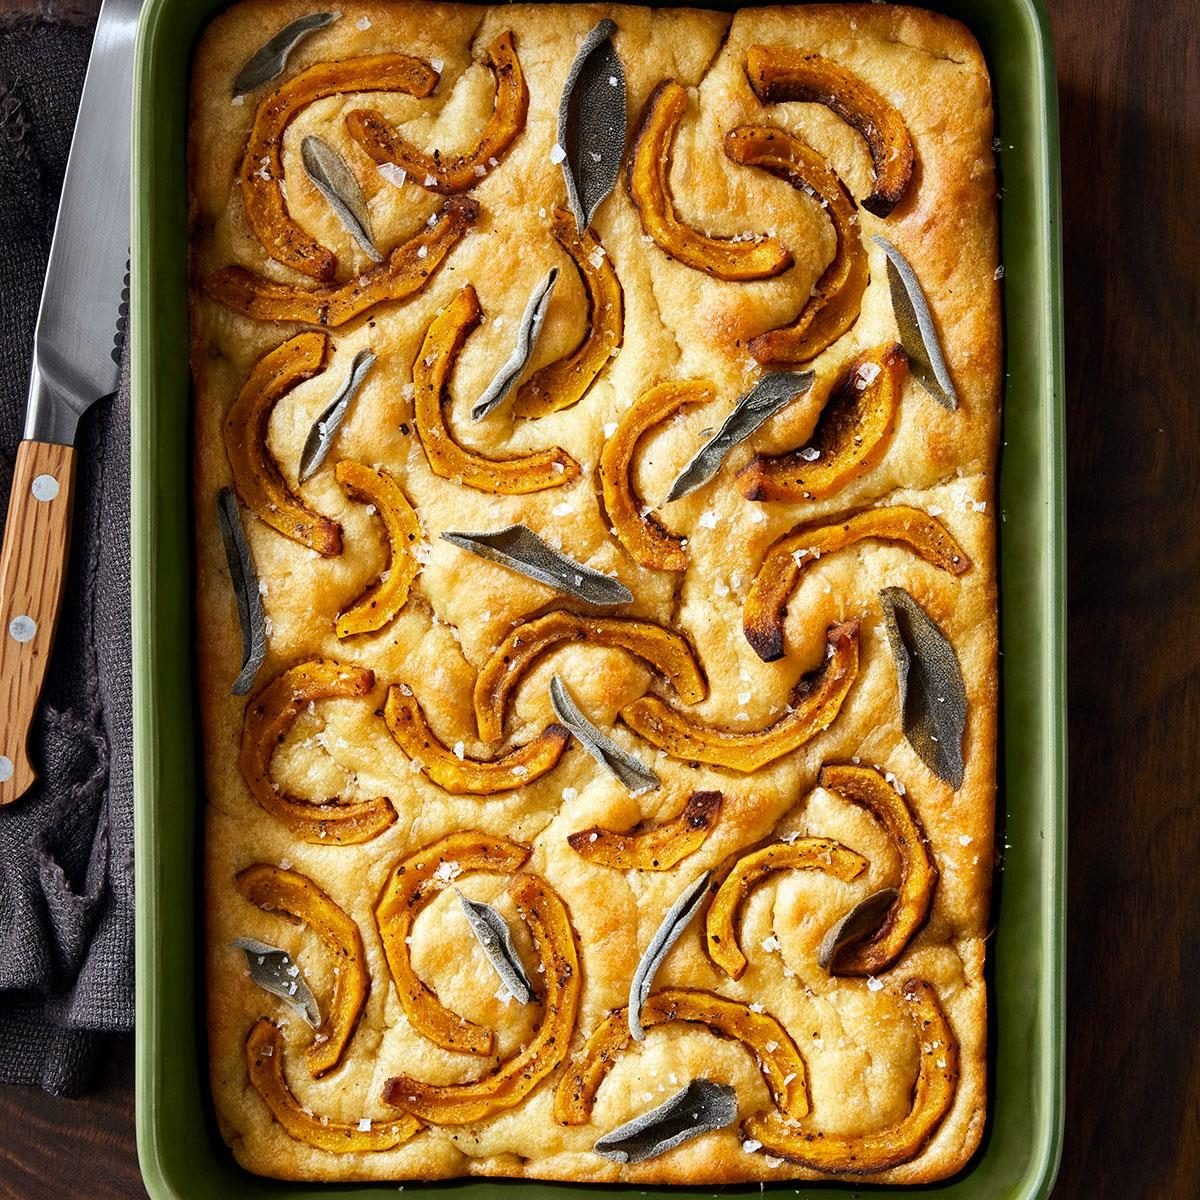
Topped with thin slices of roasted squash, fresh sage leaves and a sprinkle of flaky salt, this squash and sage focaccia is as beautiful as it is delicious and is guaranteed to make your kitchen smell amazing. It starts with an easy, no-knead yeast dough made from simple pantry ingredients. After a quick rise, the fun begins: stretching and poking the dough to create those signature focaccia dimples.
With a crisp, golden exterior and seasonal toppings, this delicata squash focaccia is the perfect fall bread for holiday tables or anytime you want to bring cozy fall flavors to your baking.
Squash Focaccia Ingredients
- Squash: Roasted winter squash adds subtle sweetness and gorgeous visual appeal. We recommend delicata or acorn squash, but if you can’t find either, butternut squash is a great substitute.
- Olive oil: We use olive oil in several steps: to roast the squash, to add moisture and richness to the dough, to grease the pan and to coat the top of the focaccia for a crisp finish. Choose a good-quality olive oil for the best flavor.
- Active dry yeast: If you’re new to working with yeast, review the basics in our guide to baking with yeast. Always check the expiration date on your yeast before using—old or expired yeast won’t allow the dough to rise.
- Warm water: Yeast needs warm water—110° to 115°F—to activate correctly. Use a cooking thermometer to ensure your water isn’t too cold or hot to keep the yeast happy.
- Honey: A touch of honey adds a hint of sweetness and helps feed the yeast for a nice rise. No honey? No problem! Substitute maple syrup or granulated sugar for the honey.
- All-purpose flour: No need for specialty flours here. Regular, all-purpose flour is all you need to create a soft, tender crumb sturdy enough to support the toppings.
- Sage: Fresh sage leaves bring an earthy, aromatic flavor and turn crispy in the oven. If you have only dried sage, mix a small amount (about 1/2 teaspoon) into the dough or whisk it into the final drizzle of olive oil.
- Flaky sea salt: Finishing the focaccia with flaky sea salt (like Maldon) is optional, but highly recommended. Just a sprinkle adds crunch and briny flavor.
Directions
Step 1: Roast the squash

Preheat your oven to 425°F. Place the peeled, seeded and sliced squash in a large bowl. Drizzle with 2 tablespoons of olive oil and season with salt and pepper. Toss to coat.
Spread the squash in a single layer on a greased rimmed baking pan. Roast, uncovered, for 25 to 30 minutes or until just tender. Set aside to cool completely.
Editor’s Tip: To prep your squash, start by slicing off the ends. Use a knife or vegetable peeler to remove the skin, then cut the squash in half lengthwise. Scoop out the seeds with a spoon, and slice crosswise into thin half-moons. If it’s hard to cut, microwave the whole squash for two to three minutes to soften.
Step 2: Proof the yeast
While the squash roasts, start the dough. In a large bowl, dissolve the yeast in 1/2 cup warm water (it should be about 110°) with the honey. Let the mixture sit until it looks frothy and foamy, about five minutes.
Editor’s Tip: If the mixture doesn’t turn foamy, your yeast isn’t active and won’t ferment the dough. Discard it, double-check the yeast’s expiration date and use a cooking thermometer to ensure your water is the correct temperature.
Step 3: Mix the dough

Add the flour, 1/4 cup olive oil, kosher salt and remaining 3/4 cup warm water to the yeast mixture. Mix with a wooden spoon until the dough is smooth, sticky and wet.
Step 4: Let the dough rise

Use a spatula to scrape down the sides of the bowl to gather the dough into a rough ball.

Cover the bowl with storage wrap or a clean kitchen towel. Let it rise in a warm, draft-free spot until doubled in size, about 45 minutes.
Editor’s Tip: If your dough hasn’t doubled in size after an hour, try moving it to a warmer spot, near a sunny window or inside a cold (turned off) oven with the light on. For more tips, check out our guide to proofing bread.
Step 5: Shape the focaccia

Brush a 13×9-inch baking dish or a 12-inch cast-iron skillet with 1 tablespoon olive oil. Gently scrape the dough into the prepared pan. With lightly oiled hands, gently press and stretch the dough toward the edges of the pan. If it springs back, let it rest for about 10 minutes, then try again.

Once the dough is spread out, use your fingertips to make indentations over the surface. Drizzle the top with the remaining 2 tablespoons of olive oil.
Editor’s Tip: When adding the dimples, press firmly enough to feel the bottom of the pan but not so hard that you tear through the dough.
Step 6: Proof again
Let the dough rise in a warm spot for a second time, until it’s doubled in size, 30 to 40 minutes.
Step 7: Add toppings

Arrange the roasted squash slices and sage leaves evenly over the top. Lightly press them into the dough so they stay in place. If desired, sprinkle with flaky sea salt.
Step 8: Bake
Bake for another 25 to 30 minutes or until the focaccia is golden brown and crisp around the edges. Let it cool slightly, then cut it into squares and serve warm.

Recipe Variations
- Switch up the herbs: Swap in fresh rosemary or thyme for the sage for a different aromatic flavor. If you have only dried herbs, stir a pinch into the dough or whisk them into the olive oil drizzle before baking to keep them from burning.
- Layer on sweet toppings: Roasted squash offers a subtle natural sweetness, but you can boost it with extras like jammy caramelized onions, fresh or dried cranberries, or thinly sliced apples or pears for more depth. After baking, drizzle the warm focaccia with regular or hot honey before serving for a sweet finish.
- Make it cheesy: Cheese adds a rich, melty element and savory contrast to the squash. Sprinkle grated Parmesan or shredded mozzarella during the last 10 minutes of baking for a golden, bubbly top, or try a creamy option like sliced Brie or crumbled goat cheese layered on top before baking.
- Add crunch: Scatter a handful of pepitas, chopped walnuts or pecans over the dough before baking for added texture and toasty flavor.
How to Store Squash Focaccia
Let the squash and sage focaccia cool to room temperature, then wrap leftover slices loosely in storage wrap or transfer them to an airtight container. Store at room temperature for three to four days. Warm slices in a toaster oven or bake in a 350° oven for 10 minutes to crisp up the edges and soften the center.
Can you freeze squash focaccia?
Yes, you can freeze leftover delicata squash focaccia to make it last longer. Wrap individual slices tightly in foil, then place them in a freezer-safe container or resealable bag. Freeze for up to three months. When ready to enjoy a piece, reheat from frozen in a 350° oven until warmed through.
Squash Focaccia Tips

Can I make the focaccia dough ahead of time?
Yes, you can make the focaccia dough up to one day in advance. After the first rise, cover the bowl with storage wrap or a lid and place it in the refrigerator. Chilling yeast dough slows fermentation so your dough won’t continue to rise too much in the fridge.
When you’re ready to bake, let the dough come to room temperature before transferring it to the baking dish. Then, continue with the second rise, add the toppings and bake as directed.
Do I need to peel the squash?
It depends! This recipe calls for peeling the squash before roasting, but delicata and acorn squash have thin, tender skins that are entirely edible once cooked. The skin adds fiber and nutrients, plus brings extra visual interest to the focaccia.
The bottom line? Peel your squash if you prefer a smoother look and texture. If you’re short on time or want to keep the added color and nutritional boost, feel free to leave it on.
Why isn’t my focaccia dough rising?
If your focaccia dough isn’t rising, it could be due to inactive or expired yeast or improperly proofed yeast. Dissolving yeast in water that is too hot can kill the yeast, while water that’s too cold won’t activate it. Aim for a temperature around 110°, and make sure it starts to foam after 5 to 10 minutes—that means the yeast is alive and active.
If your yeast is fresh and the water temperature is correct, your kitchen’s ambient temperature may be to blame. Yeast doughs need a warm, draft-free spot to rise. If your kitchen feels chilly, try moving the dough to a warmer location, like a sunny window or a turned-off oven with the light on. In colder seasons, the dough may need a little more time to double in size.
How do I know when the focaccia is done baking?
Your focaccia is ready when the top is golden brown, the edges are crispy and it looks slightly puffed. The center should spring back lightly when pressed, and the bread should pull away easily from the sides and bottom of the pan. If you’re unsure, lift a corner with a spatula to check the underside is browned, or insert a toothpick into the center—it should come out clean, not sticky or wet.
Ingredients
- 1 small delicata squash or 1/2 acorn squash, peeled, seeded and sliced
- 2 tablespoons olive oil
- 1/2 teaspoon each salt and coarsely ground pepper
- dough:
- 1 package (1/4 ounce) active dry yeast
- 1-1/4 cups warm water (110° to 115°)
- 1 tablespoon honey
- 3 cups all-purpose flour
- 1/4 cup plus 3 tablespoons olive oil, divided
- 3/4 teaspoon kosher salt
- 1/4 cup fresh sage
- 1 teaspoon flaky sea salt, optional
Directions
- Place squash into a large bowl, drizzle with oil. Sprinkle with salt and pepper; toss to coat.
- Transfer to a greased rimmed baking pan. Bake, uncovered, at 425° for 25-30 minutes or until just tender. Cool completely.
- Meanwhile, in a large bowl, dissolve yeast in 1/2 cup warm water and honey; let stand for 5 minutes. Add flour, 1/4 cup oil, kosher salt and remaining 3/4 cup warm water; mix until smooth (dough will be wet). Scrape sides of the bowl clean; cover and let rise in a warm place until doubled, about 45 minutes.
- Brush a 13x9-in. baking dish or 12-in. cast-iron skillet with 1 tablespoon oil. Gently scrape dough directly into pan. With oiled hands, gently spread dough. If dough springs back, wait for 10 minutes and stretch again. Make indentations in dough with your fingers. Drizzle with remaining 2 tablespoons oil; let rise until doubled in size, 30-40 minutes.
- Distribute prepared squash and sage leaves over top of dough, pressing lightly into dough; sprinkle with sea salt. Bake until golden brown, 25-30 minutes. Cut into squares; serve warm.
Loading Popular in the Community
This savory sage and squash foccacia recipe is a creative and delicious way to put a bumper crop to use in the fall. The veggie slices on top of the bread will make your friends, family, and guests do a double-take! —Margaret Knoebel, Milwaukee, Wisconsin
Recipe Creator
Loading Reviews